
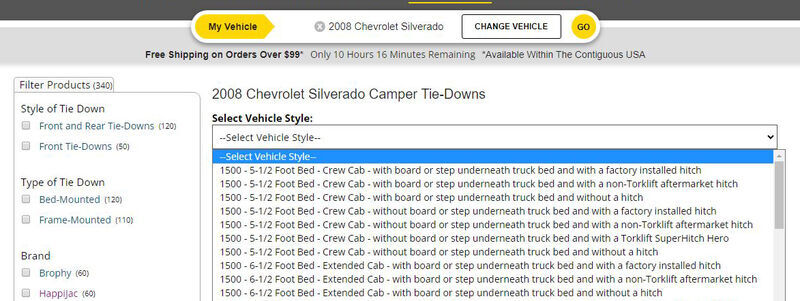
To see if this custom-fit item will work for you please tell us what vehicle you'll use it with.
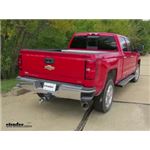
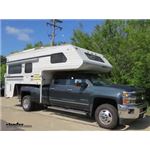
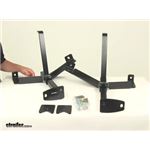
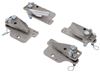
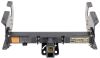
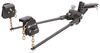
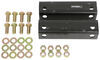
These custom fit tie-downs give you the safest and most comfortable ride when hauling a camper. They mount to the frame of your pickup - no drilling required! With the arms removed, the brackets can barely be seen.
Features:
If you're looking for the best tie-downs for your camper, frame-mounted is the way to go. The frame is the most solid part of your entire vehicle, so it just makes sense to attach your camper to something that's not going to warp, bend, or twist. Even more importantly, the camper's center of gravity will sit lower and its weight will be spread across the entire bed. This avoids a top-heavy load perched on top of your bed rails that's liable to sway and get pushed around by crosswinds. The camper's not going to shift or slide around while you drive; it's going to stay put, and your truck is going to handle just like it does without a camper.
Quick Tip: If you have a plastic or spray-in bed liner, it's important that you use a rubber mat under the camper to eliminate any sliding or bouncing.
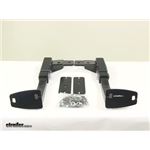
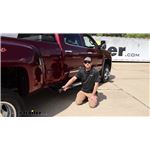
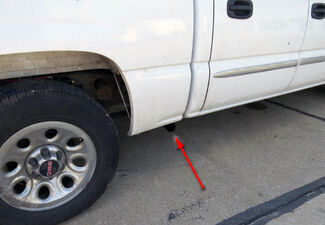
Frame-mounted tie-downs are also a great pick for preserving your truck's good looks. The brackets install on the frame, tucked nearly flush with the underside of the vehicle. Remove the arms from the brackets when you're not hauling your camper, and the brackets will be barely visible.
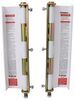
Completely custom to your vehicle, the tie-downs attach to exisiting holes in your frame so that there's little to no drilling and no need for any modifications. Because they're custom, you'll want to use our in-house application guide to make sure you get the exact right model. The tie-downs you need might be different depending on what type of hitch or other accessories you have.
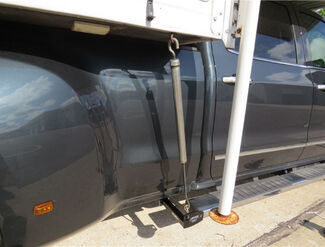
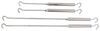
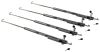
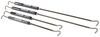
Once the tie-downs are installed, use a set of turnbuckles (sold separately) to secure the camper to the tie-downs. The shank on each arm has 2 pin holes so you can choose how far out they extend, that way the turnbuckles can reach the anchors on your camper without making contact with your truck. Tighten the turnbuckles to the correct level of tension (not too tight!).
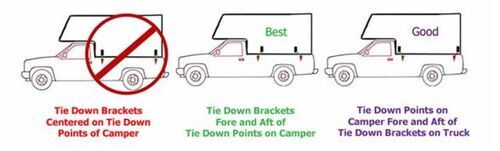
Make sure the anchor points are offset from the tie-downs instead of lined up with them so that they will hold your camper from multiple angles. This is important for keeping your camper from shifting. Two holes in the attachment plate of the tie-downs let you find the best angle for you camper anchors.
California residents: click here
Videos are provided as a guide only. Refer to manufacturer installation instructions and specs for complete information.
Speaker 1: Today on our 2016 Chevrolet Silverado 2500 we're going to be taking a look at and showing you how to install the TorkLift Custom Frame-Mounted Camper Tie-Downs for the rear, part number TLC3215. Here's what our camper tie-downs look like once we have them fully installed. Now, we are using them in conjunction with the front, and you can pick those up on our website using part number TLC2220. These are going to serve the purpose to keep our camper secure when we're driving down the road so we don't have to worry about it moving around on us. Now, our tie-downs are frame-mounted tie-downs, and the big advantage over the bed style tie-downs is the fact that our tie-down point is going to be lower, which is going to keep our load more stable instead of being up so high, and less top heavy, and it's going to be more structurally sound because it's going directly to the frame. What you're really going to appreciate about the fact that it's frame-mounted is we're not going to have to drill into our bumper or potentially cause any damage to our bed, which is also going to prevent rust from happening, keeping the value of your truck longer.One thing also that you're really going to like is you're not going to lose any ground clearance since it mounts to the frame, which is above our body here.
Now, another thing is that it's all made out of nice steel construction, it's got a black power coat finish, so it's going to look nice for a long time. When we're not towing our camper we can simply remove the pin and clip and the arm is going to come out, and it's virtually invisible, so it's not going to have a big gaudy thing to look at when we're not towing.Now, our arm has two holes in it, and that's going to accommodate different width of campers that you might have, so we have one here, it's going to stick out a little bit farther, or we can go into the second hole here, which will be a little bit closer to our truck. Now we always recommend that you use four tie-down points, and that's why we're using it in conjunction with the front, and you're really going to like the no-drill application, super simple installation.Now that we've seen what they look like and gone over some of the features, let's show you how to put them on. The first step in our installation is to come to our rear bumper, and we're going to come towards the inside toward the front of our cab of our truck, and we're going to find the spring perch that our leaf spring is mounted to. Here's where our leaf spring's mounted, and the perch is going to be right here.
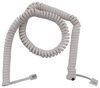
We're going to notice that there's a hole directly underneath our leaf spring right here, and we're going to need to get some hardware in place. Now we're going to take our pull wire and we're going to take the coiled end and we're going to feed it through that hole at the bottom of our spring perch, and we're going to feed it up and towards the center of our truck, towards the spare tire. There's going to be an access hole in the spare tire, and if you need to, you can just reach in and grab the pull wire till the coiled end's coming out. You don't want it to go all the way in, just enough so that you can get access to the coiled end again.We're going to take a 7/16 bolt followed by a star washer, and followed by a spacer block, so the assembly will look like this. Now we're going to thread out 7/16 bolt onto the end of the coiled pull wire and we're going to feed it through and pull our pull wire till it comes out the bottom here.
Now, I'll let you know that it's going to be much, much easier if you do this as one assembly rather than trying to do piece by piece, feeding it in place. If you can, you're going to want to put some tension on it and hold that block and washer and the bolt all together while you're feeding it in. It may take a little finesse and a little bit of patience to get everything through, and if you're having trouble you can reach through, if you can, maybe get a screwdriver and start prying on it until you get everything in place. The end result should have the bolt coming through with the spacer block and star washer engaged around it.You'll want to grab your passenger tie-down bracket, and we're going to know it's the passenger's side because the tab that's coming up off of the straight piece here will have an oblong hole and we're going to have three holes on the other side of it. Once we lift it up, we're going to take that bolt that we fed through, take our pull wire, feed it through that oblong hole, and we're going to lift it up into position, and you'll notice that it's going to line up with our factory hitch.
We can go ahead and pull our pull wire off, and I'm just going to pull it off, but you want to be extra careful and actually unthread yours because you're going to need it to put the other side on.Now, to secure this down we're going to take a spacer block, just like we had on the inside and we're going to follow that up with a lock washer and then a nut. We just want to put that on there hand tight as best as you can, and get ready to put the rest of our hardware in place. Our next step is we're going to have this spacer plate here and we're going to have three holes in it. We're going to be paying attention to the center hole first. Now we're going to take a 1/2 inch bolt and washer and we're going to pass through the center of our plate. Now we're going to need to get this inside of our hitch in this area here so that the holes will line up and that bolt's going to be coming to the bottom. The easiest way to do this is coming from the front side towards our cab and you're going to want to tilt the plate at about a 45-degree angle, and it's going to take a little bit of finesse because of that bolt in there, but you're going to pass it through until the bolt drops down through the bottom through both plates and our brackets.Now, this is for a short bed application. We'll notice that the rear hole is blocked by our hitch, but the forward hole, we're able to pass through and it lines up. We're going to take another 1/2 inch bolt and flat washer and we're going to drop through both brackets as well. Now, if you have a long bed truck, you're going to be using both outside holes and not the middle. Get ready to secure everything down. We're going to take a 1/2 inch flat washer followed by another lock washer and then finally we're going to come back with a 1/2 inch nut. Now, at this point you just want to get them hand tight so you can get everything in place, and if you push on the washer just a little bit, it will make it a little bit easier to start that nut and you don't have to worry about the bolt spinning as much. We'll go ahead and do that for the other bolt as well. Now, I'm going to come back using a 3/4 inch wrench and socket and I'm going to snug up all my 1/2 inch hardware.For my 7/16 hardware I'm going to be using an 11/16 socket. I'm going to come back and torque down all my hardware to the specified amount in the instructions. Finally, we take our bracket and we're going to notice it's going to have two holes. We're going to be using this one, slide it into place, take the included clip, going through both holes, coming out the other side and locking it into place. Now, you're going to know you have the right bracket because here on the rear the smaller end is going to be pointing toward the rear. When we don't have our camper in place, just so we know which one is which, we have a sticker to remind us that this is going to be our driver rear, as well as one for the passenger rear. Now we have that one on, you're going to want to go ahead and do the passenger's side as well. You just want to keep in mind you're just going to have to work around the tailpipe here.That will finish up your look at the TorkLift Custom Frame-Mounted Camper Tie-Downs for the rear, part number TLC3215 on our 2016 Chevrolet Silverado 2500.

Info for this part was:
At etrailer we provide the best information available about the products we sell. We take the quality of our information seriously so that you can get the right part the first time. Let us know if anything is missing or if you have any questions.


Thank you! Your comment has been submitted successfully. You should be able to view your question/comment here within a few days.
Error submitting comment. Please try again momentarily.